Cover 3 and Cover 3 Match — Reads, Variants and Beaters
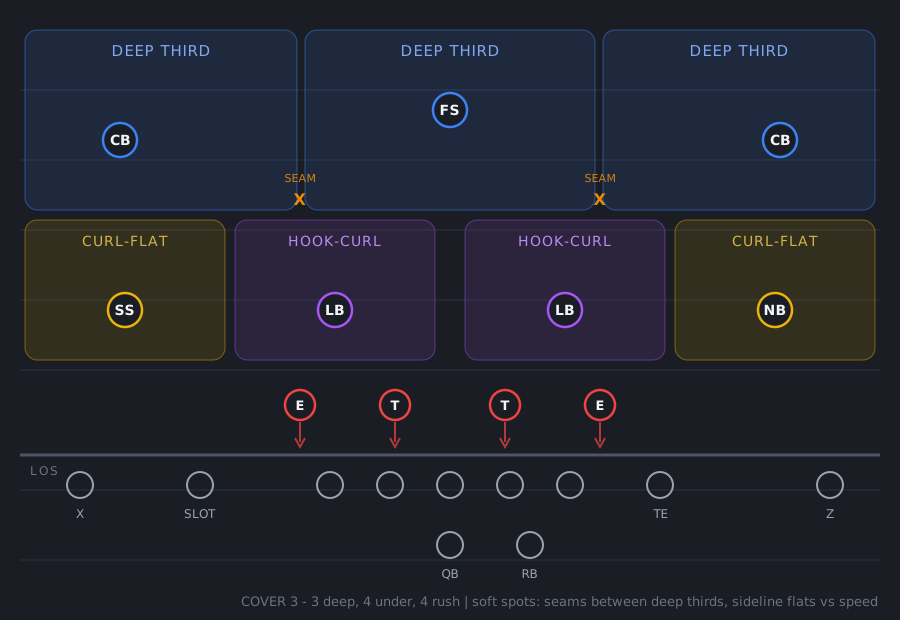
How to identify it
- One high safety in the deep middle.
- Corners 7–8 yards off the ball on both sides. (Pressed corners under one high = think cover 1 instead.)
- Motion test: nobody chases across = cover 3; a trailing defender = cover 1.
- Which variant? Watch the post-snap rotation:
- Sky — the strong safety rolls down to the curl flat, an extra defender in the box.
- Cloud — a corner squats in a hard flat on the line while the safety bails to his deep third.
- Buzz — a safety drops into the middle hook while a linebacker buzzes out to the flat.
- Match — play art shows the pinkish outside zones; post-snap, the "zone" defenders latch onto routes man-style once they declare.
- Good players run all of it from a two-high cover 2 shell and rotate at the snap — trust the motion test and the rotation, not the pre-snap safety picture.
How to beat it
Base cover 3: attack the seams
Setup (pre-snap):
- Streak both slot/inside receivers — those verticals split the hook-curl linebackers and the curl-flat nickels.
The read:
- The lone post safety must pick a side — throw the opposite seam, leading slightly inside.
- If a user switch-sticks to one seam, throw the other one off him — even late, the middle stays open.
- When you don't want the shot, settle curls and diggers into the soft spots underneath, between the purple hook-curls and yellow curl-flats.
Per-variant soft spots
| Variant | Attack |
|---|---|
| Sky | Quick outs and hitches to the sideline — the rolled-down safety can't be in the box and the flat at once. Nickel-and-dime it; impatience is the only reason this "weakness" goes unpunished. |
| Cloud | Deep shots down the pressed corner's sideline — the safety replacing him over the top starts from depth. |
| Buzz | Quick flats and screens — the buzzing linebacker has to sprint laterally to arrive; throw before he gets there. |
| Match | Delay routes and the bunch-vs-Skate corner (below). Seams and floods are dead — don't force them. |
Cover 3 Match: know its rules, then break them
How it plays (Devron + Coach TWILL, counting receivers outside-in on each side):
- Corners play MOD/MEG on #1 — once #1 pushes vertical past ~10 yards they man up and run wherever he goes, even a post across the field; if he breaks short they drop off into the third.
- Seam-flat/apex defenders own #2 vertical or outside; that kills the easy seam throws that gut regular cover 3 sky. If #2 goes under, they push him inside and look for work in the flat.
- Middle-third safety plays pure zone — he matches nobody and caps crossers.
- Hook defenders relate to #3 and the back with pass-off ("push") rules: verticals by #2 mean the hook replaces the flat and mans the RB swing; a #3 deep crosser gets carried man-to-man across the field instead of passed into space. Because there's an extra underneath body vs quarters, mesh and drag pairs get passed off cleanly and smothered.
- Net effect: every route distribution eventually converts it into cover 1 — "all the pros of man with none of the downsides." Mesh, floods, Y-cross, and pure man-beaters get matched cleanly. Attribute note: those matches are only as good as the defenders — a linebacker seam-flat carrying a slot vertical is a mismatch you can hunt.
What actually beats it:
Delay routes — the matching rules visibly break down against delayed releases from the backfield.
Bunch vs the Skate check (the default vs bunch). Skate isn't true matching — the underneath defenders just widen their drops toward the bunch to blanket floods, and the corner won't even carry #1 vertical:
- Line up in bunch.
- Throw the corner route out of bunch — it stays open because the hook never gets under it.
- Don't bother flooding the bunch — widening is exactly what Skate is built for; the corner route is the hole.
Vs Skinny MEG:
- Find the backside corner — he is alone, man-everywhere.
- Attack that island with your best receiver.
- Work crossers into the space the MEG corner no longer squeezes.
Once it converts to man, everything in How to Beat Man Coverage (Any Shell) applies: picks, stacked releases, Texas routes.
If you're the one calling it
- Run the whole scheme from one look: a cover 2 shell (right stick → shell) out of Nickel Over. Two-high pre-snap reads as cover 2/cover 4; the sky/cloud/buzz rotations and your mixed-in man and Tampa 2 all look identical until the snap.
- Base = Cover 3 Sky. The rolled-down safety is a free extra box defender — it's the best cover 3 against sweeps, stretches, and outside runs, and you can sit in it all game because almost nobody patiently nickel-and-dimes the sideline.
- Cloud when they live on bubble screens or one star receiver — the hard-flat corner jams him at the line, wrecking route timing, with the rotated safety over top.
- Match on obvious pass downs (third-and-long, streak-happy opponents). Vs trips it defaults to Skinny — the backside corner drops off short in-breakers rather than chasing (turn on Skinny MEG in coaching adjustments if you want him manned everywhere). Vs bunch it defaults to Skate; switch the bunch check to Skinny in coaching adjustments for true matching — or macro the toggle so you can flip it by expected route combo.
- Buzz against dig/post/crosser teams — quarterbacks expect a linebacker in that window, not a safety. Pick the call so the hook-dropping safety is on the side the crosser is coming toward. Know the buzz trade-offs: a linebacker walks out over #2 (mismatch if #2 goes vertical) and the flats are slow to be covered.
- If you user inside a match call, know your assignment. The backside hook must key #3 — if you chase an underneath route while your teammates pass a crosser toward you, that's a blown coverage, and one missed pass-off is a touchdown. Lab it in practice mode before taking it online; until then, user the deep free safety instead.
Full check glossary in How to Read Coverages Pre- and Post-Snap.
54 more articles are members-only — the schemes, counters and macros, re-cut after every patch. What members are reading right now: